
Back up your whole muOS SD card over Wi-Fi, without taking it out
SD cards fail. They get corrupted after a flat battery, they get lost, or they just wear out. On a handheld like the Anbernic RG40XXH, the card holds everything: muOS itself, your settings and themes, your games, and your save files. This guide shows how to keep a complete copy of it and how to get everything back on a new card, exactly as it was.
Tested on: Anbernic RG40XXH · muOS 2601.0 Jacaranda · Wi-Fi Transfer 2.0.0.
What you need
- The handheld with Wi-Fi turned on, and its charger.
- A PC or Mac on the same Wi-Fi, with enough free space for the backup (about as much as the data on your card). A phone is usually too small.
- Wi-Fi Transfer, our free muOS app. To install it, see How to install apps on muOS with Archive Manager.
- For restoring: a new SD card the same size or bigger, a card reader, and Rufus (Windows) or balenaEtcher (Mac, Linux, Windows).
Why a full card backup, not just copying files?
Copying your ROMS and save folders is useful, but it isn’t enough to rebuild the card. muOS runs from several partitions on SD card 1 (a boot partition, the system, and the partition you see with your games), and a normal file copy only sees the last one. A full card image includes all of them, so writing it to a new card gives you a handheld that starts up just like before: same muOS version, same settings, same games and saves.
Part 1: Make the backup
- Plug in the handheld and turn on Wi-Fi (Configuration → Connectivity → Wi-Fi Network).
- Open Applications → Wi-Fi Transfer. It shows a QR code, an address and a PIN.
- On your PC, type the address (for example
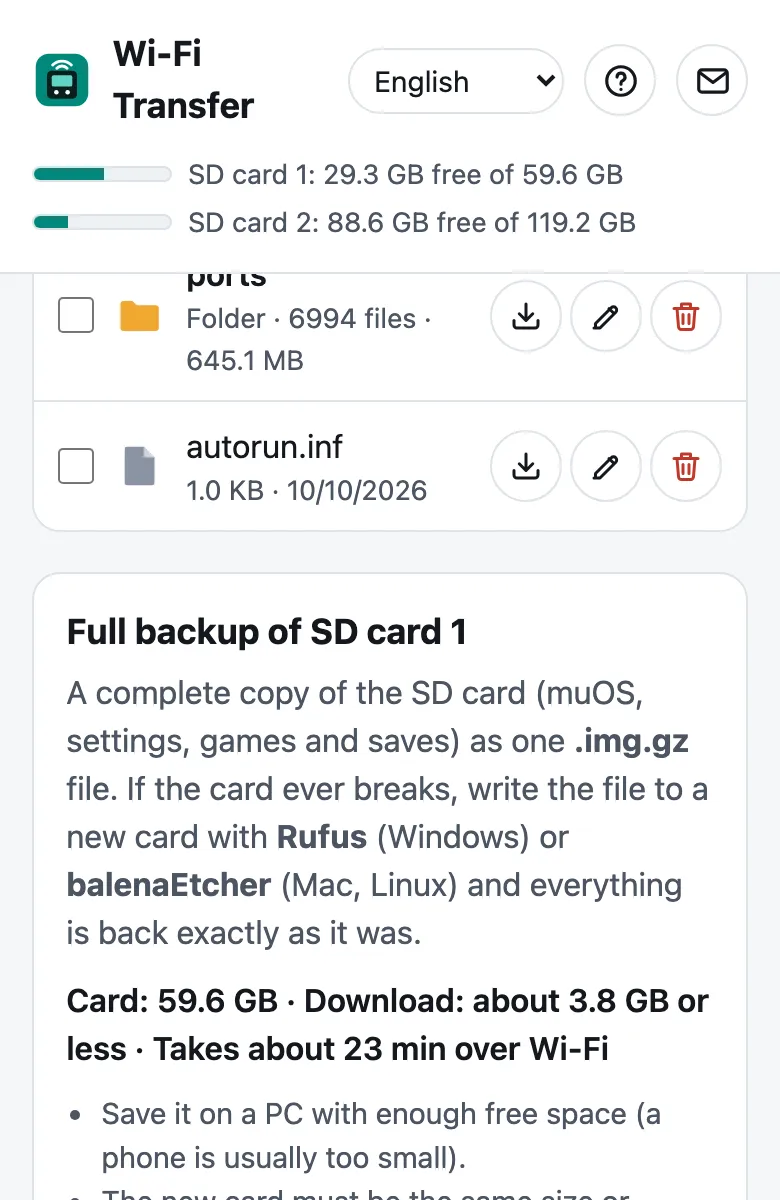
http://192.168.1.23:8080) into a browser and enter the PIN. - Below the SD card 1 and SD card 2 tabs, find Full backup of SD card 1. It shows the card’s size and roughly how big the download will be and how long it will take.
- Tap Start backup. Your browser downloads a file called
muOS-SD-backup-DATE.img.gz. - Keep the handheld and the page on until the download finishes. The page shows how far it’s got and the time left.
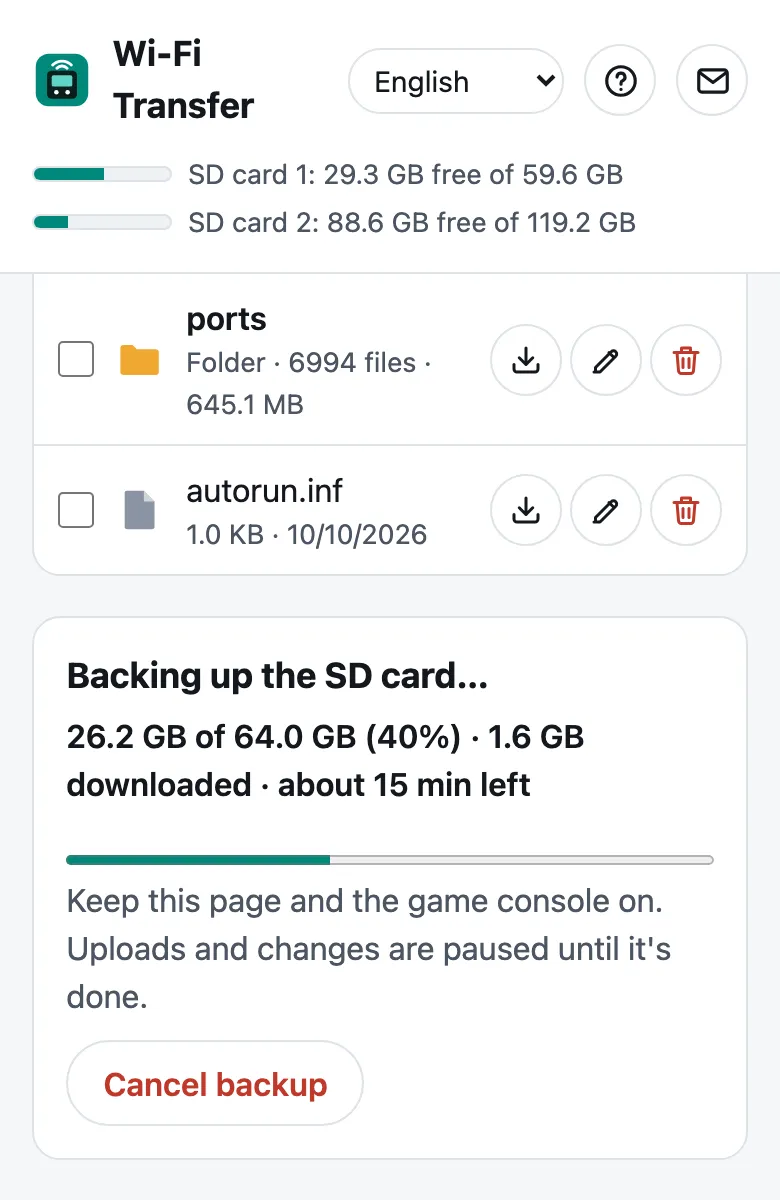
When your browser says the download is complete (with no error), the backup is done. Keep the file somewhere safe: an external drive or a cloud folder.
How big and how long? Empty space isn’t sent: Wi-Fi Transfer reads which parts of the games partition are in use and skips the rest. A 64 GB card with 4 GB of data downloads about 4 GB, not 64. Over Wi-Fi it takes roughly 1 hour per 10 GB.
Download bigger than your files? The estimate counts all the space the card marks as used. If a copy was ever cut off (a flat battery, a crash), some space can stay marked as used with no file in it. A disk check on a PC or Mac (Mac: Disk Utility → First Aid; Windows: Properties → Tools → Check) frees it, and the backup gets smaller.
Is the copy consistent? While the backup runs, uploads and changes in Wi-Fi Transfer are paused, and the games partition is made read-only during the copy when possible, so files can’t change halfway through.
Things to know:
- Safari on a Mac unpacks
.gzfiles by itself. Turn off Safari → Settings → General → Open “safe” files after downloading before you start, so you keep the.img.gzfile. - To stop early, tap Cancel backup (or press B twice on the handheld), then delete the incomplete file.
- Keep it private. The backup contains your games, saves and BIOS files. It’s for your own use; don’t share it.
Part 2: Restore to a new card
Restoring replaces everything on the new card. Double-check you’ve picked the right drive.
Windows, with Rufus
- Put the new card in your PC and open Rufus.
- Device: choose the SD card. Check it’s the right one by its size and name.
- SELECT: choose your
.img.gzbackup. You don’t need to unpack it. - Press START, confirm, and wait until it says READY.
- If Windows then asks to format the card, press Cancel. That message only appears because Windows can’t read muOS’s system partitions; the card is fine.
Mac or Linux, with balenaEtcher
- Put the new card in your computer and open balenaEtcher.
- Flash from file: choose your
.img.gzbackup. - Select target: choose the SD card.
- Press Flash! and wait until it has finished and verified the card.
Put the card in the handheld and turn it on. It starts exactly as it was when you made the backup.
Bigger card? The restored card has the same partition sizes as the old one, so the extra space isn’t used at first.
Only need a few files back?
You don’t have to restore the whole card to get one save file back. Unpack the .img.gz (for example with 7-Zip on Windows) to get a .img file. On Windows you can then mount it with OSFMount: the games partition opens like a USB drive, and you can copy what you need.
How often should you back up?
- Before a muOS update or any big change (new theme packs, lots of new apps).
- After adding lots of games, so you don’t have to copy them again.
- Every month or so if you play a lot, to keep your saves safe.
Keep at least one older backup too, in case the newest one was made after something had already gone wrong.
Summary
- Plug in the handheld, open Wi-Fi Transfer, open the page on a PC.
- Full backup of SD card 1 → Start backup, and keep everything on until the
.img.gzhas downloaded. - To restore, write the
.img.gzto a card the same size or bigger with Rufus or balenaEtcher.
Questions? Email feedback@pocketkode.com.
PocketKode is not affiliated with muOS, Anbernic, Rufus or balenaEtcher.